
![]()
![]()
Description: This tutorial introduces the concept of an IoT Agent and wires up the dummy UltraLight 2.0 IoT devices created in the previous tutorial so that measurements can be read and commands can be sent using NGSI requests sent to the Orion Context Broker.
The tutorial uses cUrl commands throughout, but is also available as Postman documentation

What is an IoT Agent?
"In every operation there is an above the line and a below the line. Above the line is what you do by the book. Below the line is how you do the job."
— John le Carré (A Perfect Spy)
An IoT Agent is a component that lets a group of devices send their data to and be managed from a Context Broker using their own native protocols. IoT Agents should also be able to deal with security aspects of the FIWARE platform (authentication and authorization of the channel) and provide other common services to the device programmer.
The Orion Context Broker exclusively uses NGSI requests for all of its interactions. Each IoT Agent provides a North Port NGSI interface which is used for context broker interactions and all interactions beneath this port occur using the native protocol of the attached devices.
In effect, this brings a standard interface to all IoT interactions at the context information management level. Each group of IoT devices are able to use their own proprietary protocols and disparate transport mechanisms under the hood whilst the associated IoT Agent offers a facade pattern to handle this complexity.
IoT Agents already exist or are in development for many IoT communication protocols and data models. Examples include the following:
- IoTAgent-JSON - a bridge between HTTP/MQTT messaging (with a JSON payload) and NGSI
- IoTAgent-LWM2M - a bridge between the Lightweight M2M protocol and NGSI
- IoTAgent-UL - a bridge between HTTP/MQTT messaging (with an UltraLight2.0 payload) and NGSI
- IoTagent-LoRaWAN - a bridge between the LoRaWAN protocol and NGSI
Southbound Traffic (Commands)
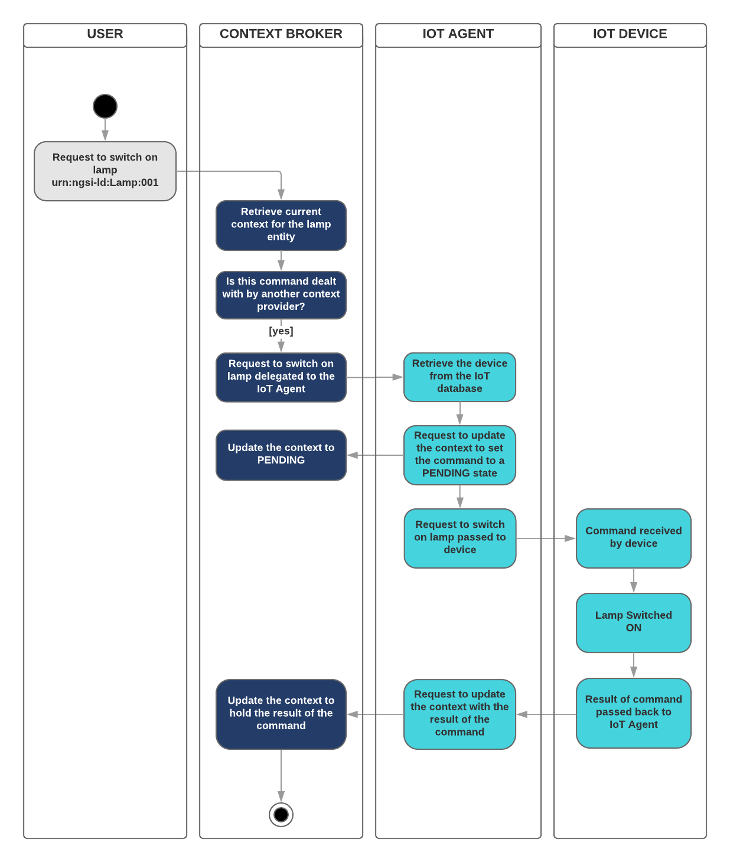
HTTP requests generated by the Orion Context Broker and passed downwards towards an IoT device (via an IoT agent) are known as southbound traffic. Southbound traffic consists of commands made to actuator devices which alter the state of the real world by their actions.
For example to switch on a real-life UltraLight 2.0 Smart Lamp the following interactions would occur:
-
An NGSI PATCH request is sent to the Context broker to update the current context of Smart Lamp
-
this is effectively an indirect request invoke the
oncommand of the Smart Lamp -
The Context Broker finds the entity within the context and notes that the context provision for this attribute has been delegated to the IoT Agent
- The Context broker sends an NGSI request to the North Port of the IoT Agent to invoke the command
- The IoT Agent receives this Southbound request and converts it to UltraLight 2.0 syntax and passes it on to the Smart Lamp
- The Smart Lamp switches on the lamp and returns the result of the command to the IoT Agent in UltraLight 2.0 syntax
- The IoT Agent receives this Northbound request, interprets it and passes the result of the interaction into the context by making an NGSI request to the Context Broker.
- The Context Broker receives this Northbound request and updates the context with the result of the command.
- Requests between User and Context Broker use NGSI
- Requests between Context Broker and IoT Agent use NGSI
- Requests between IoT Agent and IoT Device use native protocols
- Requests between IoT Device and IoT Agent use native protocols
- Requests between IoT Agent and Context Broker use NGSI
Northbound Traffic (Measurements)
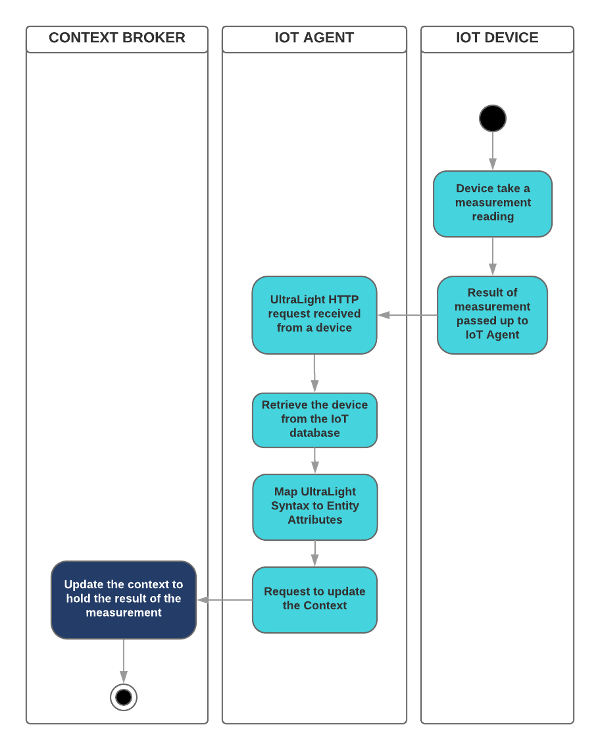
Requests generated from an IoT device and passed back upwards towards the Context Broker (via an IoT agent) are known as northbound traffic. Northbound traffic consists of measurements made by sensor devices and relays the state of the real world into the context data of the system.
For example for a real-life Motion Sensor to send a count measurement the following interactions would occur:
- A Motion Sensor makes a measurement and passes the result to the IoT Agent
- The IoT Agent receives this Northbound request, converts the result from UltraLight syntax and passes the result of the interaction into the context by making an NGSI request to the Context Broker.
- The Context Broker receives this Northbound request and updates the context with the result of the measurement.
- Requests between IoT-Device and IoT-Agent use native protocols
- Requests between IoT-Agent and Context-Broker use NGSI
Note Other more complex interactions are also possible, but this overview is sufficient to understand the basic principles of an IoT Agent.
Common Functionality
As can be seen from the previous sections, although each IoT Agent will be unique since they interpret different protocols, there will a large degree of similarity between IoT agents.
- Offering a standard location to listen to device updates
- Offering a standard location to listen to context data updates
- Holding a list of devices and mapping context data attributes to device syntax
- Security Authorization
This base functionality has been abstracted out into a common IoT Agent framework library
Device Monitor
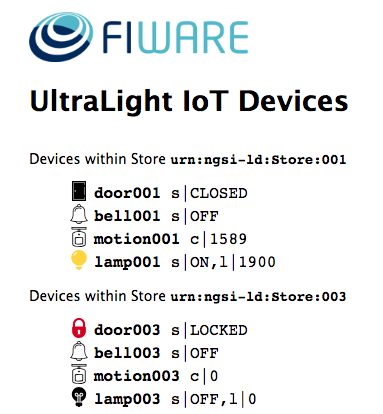
For the purpose of this tutorial, a series of dummy IoT devices have been created, which will be attached to the context
broker. Details of the architecture and protocol used can be found in the IoT Sensors tutorial The
state of each device can be seen on the UltraLight device monitor web page found at:
http://localhost:3000/device/monitor
Architecture
This application builds on the components created in previous tutorials. It will make use of two FIWARE components - the Orion Context Broker and the IoT Agent for UltraLight 2.0. Usage of the Orion Context Broker (with proper context data flowing through it) is sufficient for an application to qualify as “Powered by FIWARE”. Both the Orion Context Broker and the IoT Agent rely on open source MongoDB technology to keep persistence of the information they hold. We will also be using the dummy IoT devices created in the previous tutorial
Therefore the overall architecture will consist of the following elements:
- The FIWARE Orion Context Broker which will receive requests using NGSI
- The FIWARE IoT Agent for UltraLight 2.0 which will receive southbound requests using NGSI and convert them to UltraLight 2.0 commands for the devices
- The underlying MongoDB database :
- Used by the Orion Context Broker to hold context data information such as data entities, subscriptions and registrations
- Used by the IoT Agent to hold device information such as device URLs and Keys
- The Context Provider NGSI proxy is not used in this tutorial. It does the following:
- The Stock Management Frontend is not used in this tutorial will it does the following:
- Display store information
- Show which products can be bought at each store
- Allow users to "buy" products and reduce the stock count.
- A webserver acting as set of dummy IoT devices using the UltraLight 2.0 protocol running over HTTP.
Since all interactions between the services are initiated by HTTP requests, the services can be containerized and run from exposed ports.

The necessary configuration information for wiring up the IoT devices and the IoT Agent can be seen in the services
section of the associated docker-compose.yml file:
Dummy IoT Devices Configuration
tutorial:
    image: fiware/tutorials.context-provider
    hostname: iot-sensors
    container_name: fiware-tutorial
    networks:
        - default
    expose:
        - "3000"
        - "3001"
    ports:
        - "3000:3000"
        - "3001:3001"
    environment:
        - "DEBUG=tutorial:*"
        - "PORT=3000"
        - "IOTA_HTTP_HOST=iot-agent"
        - "IOTA_HTTP_PORT=7896"
        - "DUMMY_DEVICES_PORT=3001"
        - "DUMMY_DEVICES_API_KEY=4jggokgpepnvsb2uv4s40d59ov"
        - "DUMMY_DEVICES_TRANSPORT=HTTP"
The tutorial container is listening on two ports:
- Port
3000is exposed so we can see the web page displaying the Dummy IoT devices. - Port
3001is exposed purely for tutorial access - so that cUrl or Postman can make UltraLight commands without being part of the same network.
The tutorial container is driven by environment variables as shown:
| Key | Value | Description |
|---|---|---|
| DEBUG | tutorial:* |
Debug flag used for logging |
| WEB_APP_PORT | 3000 |
Port used by web-app which displays the dummy device data |
| IOTA_HTTP_HOST | iot-agent |
The hostname of the IoT Agent for UltraLight 2.0 - see below |
| IOTA_HTTP_PORT | 7896 |
The port that the IoT Agent for UltraLight 2.0 will be listening on. 7896 is a common default for UltraLight over HTTP |
| DUMMY_DEVICES_PORT | 3001 |
Port used by the dummy IoT devices to receive commands |
| DUMMY_DEVICES_API_KEY | 4jggokgpepnvsb2uv4s40d59ov |
Random security key used for UltraLight interactions - used to ensure the integrity of interactions between the devices and the IoT Agent |
| DUMMY_DEVICES_TRANSPORT | HTTP |
The transport protocol used by the dummy IoT devices |
The other tutorial container configuration values described in the YAML file are not used in this tutorial.
IoT Agent for UltraLight 2.0 Configuration
The IoT Agent for UltraLight 2.0 can be instantiated within a
Docker container. An official Docker image is available from Docker Hub
tagged fiware/iotagent-ul. The necessary configuration can be seen below:
iot-agent:
    image: fiware/iotagent-ul:latest
    hostname: iot-agent
    container_name: fiware-iot-agent
    depends_on:
        - mongo-db
    networks:
        - default
    expose:
        - "4041"
        - "7896"
    ports:
        - "4041:4041"
        - "7896:7896"
    environment:
        - IOTA_CB_HOST=orion
        - IOTA_CB_PORT=1026
        - IOTA_NORTH_PORT=4041
        - IOTA_REGISTRY_TYPE=mongodb
        - IOTA_LOG_LEVEL=DEBUG
        - IOTA_TIMESTAMP=true
        - IOTA_CB_NGSI_VERSION=v2
        - IOTA_AUTOCAST=true
        - IOTA_MONGO_HOST=mongo-db
        - IOTA_MONGO_PORT=27017
        - IOTA_MONGO_DB=iotagentul
        - IOTA_HTTP_PORT=7896
        - IOTA_PROVIDER_URL=http://iot-agent:4041
The iot-agent container relies on the precence of the Orion Context Broker and uses a MongoDB database to hold device
information such as device URLs and Keys. The container is listening on two ports:
- Port
7896is exposed to receive Ultralight measurements over HTTP from the Dummy IoT devices - Port
4041is exposed purely for tutorial access - so that cUrl or Postman can make provisioning commands without being part of the same network.
The iot-agent container is driven by environment variables as shown:
| Key | Value | Description |
|---|---|---|
| IOTA_CB_HOST | orion |
Hostname of the context broker to update context |
| IOTA_CB_PORT | 1026 |
Port that context broker listens on to update context |
| IOTA_NORTH_PORT | 4041 |
Port used for Configuring the IoT Agent and receiving context updates from the context broker |
| IOTA_REGISTRY_TYPE | mongodb |
Whether to hold IoT device info in memory or in a database |
| IOTA_LOG_LEVEL | DEBUG |
The log level of the IoT Agent |
| IOTA_TIMESTAMP | true |
Whether to supply timestamp information with each measurement received from attached devices |
| IOTA_CB_NGSI_VERSION | v2 |
Whether to supply use NGSI v2 when sending updates for active attributes |
| IOTA_AUTOCAST | true |
Ensure Ultralight number values are read as numbers not strings |
| IOTA_MONGO_HOST | context-db |
The hostname of mongoDB - used for holding device information |
| IOTA_MONGO_PORT | 27017 |
The port mongoDB is listening on |
| IOTA_MONGO_DB | iotagentul |
The name of the database used in mongoDB |
| IOTA_HTTP_PORT | 7896 |
The port where the IoT Agent listens for IoT device traffic over HTTP |
| IOTA_PROVIDER_URL | http://iot-agent:4041 |
URL passed to the Context Broker when commands are registered, used as a forwarding URL location when the Context Broker issues a command to a device |
Start Up
Before you start you should ensure that you have obtained or built the necessary Docker images locally. Please clone the repository and create the necessary images by running the commands as shown:
git clone git@github.com:FIWARE/tutorials.IoT-Agent.git
cd tutorials.IoT-Agent

./services create
Thereafter, all services can be initialized from the command-line by running the services Bash script provided within the repository:
./services start
Note: If you want to clean up and start over again you can do so with the following command:
./services stop
Provisioning an IoT Agent
To follow the tutorial correctly please ensure you have the device monitor page available in your browser and click on the page to enable audio before you enter any cUrl commands. The device monitor displays the current state of an array of dummy devices using Ultralight 2.0 syntax
Device Monitor
The device monitor can be found at: http://localhost:3000/device/monitor
Checking the IoT Agent Service Health
You can check if the IoT Agent is running by making an HTTP request to the exposed port:
1 Request:
curl -X GET \
  'http://localhost:4041/iot/about'
The response will look similar to the following:
{
    "libVersion": "2.6.0-next",
    "port": "4041",
    "baseRoot": "/",
    "version": "1.6.0-next"
}
What if I get a
Failed to connect to localhost port 4041: Connection refusedResponse?If you get a
Connection refusedresponse, the IoT Agent cannot be found where expected for this tutorial - you will need to substitute the URL and port in each cUrl command with the corrected IP address. All the cUrl commands tutorial assume that the IoT Agent is available onlocalhost:4041.Try the following remedies:
- To check that the docker containers are running try the following:
docker psYou should see four containers running. If the IoT Agent is not running, you can restart the containers as necessary. This command will also display open port information.
- If you have installed
docker-machineand Virtual Box, the context broker, IoT Agent and Dummy Device docker containers may be running from another IP address - you will need to retrieve the virtual host IP as shown:
curl -X GET \
  'http://$(docker-machine ip default):4041/version'
Alternatively run all your curl commands from within the container network:
docker run --network fiware_default --rm appropriate/curl -s \
 -X GET 'http://iot-agent:4041/iot/about'
Connecting IoT Devices
The IoT Agent acts as a middleware between the IoT devices and the context broker. It therefore needs to be able to
create context data entities with unique IDs. Once a service has been provisioned and an unknown device makes a
measurement the IoT Agent add this to the context using the supplied <device-id> (unless the device is recognized and
can be mapped to a known ID.
There is no guarantee that every supplied IoT device <device-id> will always be unique, therefore all provisioning
requests to the IoT Agent require two mandatory headers:
fiware-serviceheader is defined so that entities for a given service can be held in a separate mongoDB database.fiware-servicepathcan be used to differentiate between arrays of devices.
For example within a smart city application you would expect different fiware-service headers for different
departments (e.g. parks, transport, refuse collection etc.) and each fiware-servicepath would refer to specific park
and so on. This would mean that data and devices for each service can be identified and separated as needed, but the
data would not be siloed - for example data from a Smart Bin within a park can be combined with the GPS Unit of
a refuse truck to alter the route of the truck in an efficient manner.
The Smart Bin and GPS Unit are likely to come from different manufacturers and it cannot be guaranteed that
there is no overlap within <device-id>s used. The use of the fiware-service and fiware-servicepath headers can
ensure that this is always the case, and allows the context broker to identify the original source of the context data.
Provisioning a Service Group
Invoking group provision is always the first step in connecting devices since it is always necessary to supply an authentication key with each measurement and the IoT Agent will not initially know which URL the context broker is responding on.
It is also possible to set up default commands and attributes for all anonymous devices as well, but this is not done within this tutorial as we will be provisioning each device separately.
This example provisions an anonymous group of devices. It tells the IoT Agent that a series of devices will be sending
messages to the IOTA_HTTP_PORT (where the IoT Agent is listening for Northbound communications)
2 Request:
curl -iX POST \
  'http://localhost:4041/iot/services' \
  -H 'Content-Type: application/json' \
  -H 'fiware-service: openiot' \
  -H 'fiware-servicepath: /' \
  -d '{
 "services": [
   {
     "apikey":      "4jggokgpepnvsb2uv4s40d59ov",
     "cbroker":     "http://orion:1026",
     "entity_type": "Thing",
     "resource":    "/iot/d"
   }
 ]
}'
In the example the IoT Agent is informed that the /iot/d endpoint will be used and that devices will authenticate
themselves by including the token 4jggokgpepnvsb2uv4s40d59ov. For an UltraLight IoT Agent this means devices will be
sending GET or POST requests to:
http://iot-agent:7896/iot/d?i=<device_id>&k=4jggokgpepnvsb2uv4s40d59ov
Which should be familiar UltraLight 2.0 syntax from the previous tutorial.
When a measurement from an IoT device is received on the resource URL it needs to be interpreted and passed to the
context broker. The entity_type attribute provides a default type for each device which has made a request (in this
case anonymous devices will be known as Thing entities. Furthermore the location of the context broker (cbroker) is
needed, so that the IoT Agent can pass on any measurements received to the correct location. cbroker is an optional
attribute - if it is not provided, the IoT Agent uses the context broker URL as defined in the configuration file,
however it has been included here for completeness.
Provisioning a Sensor
It is common good practice to use URNs following the NGSI-LD specification when creating entities. Furthermore it is easier to understand meaningful names when defining data attributes. These mappings can be defined by provisioning a device individually.
Three types of measurement attributes can be provisioned:
attributesare active readings from the devicelazyattributes are only sent on request - The IoT Agent will inform the device to return the measurementstatic_attributesare as the name suggests static data about the device (such as relationships) passed on to the context broker.
Note: in the case where individual
ids are not required, or aggregated data is sufficient theattributescan be defined within the provisioning service rather than individually.
3 Request:
curl -iX POST \
  'http://localhost:4041/iot/devices' \
  -H 'Content-Type: application/json' \
  -H 'fiware-service: openiot' \
  -H 'fiware-servicepath: /' \
  -d '{
 "devices": [
   {
     "device_id":   "motion001",
     "entity_name": "urn:ngsi-ld:Motion:001",
     "entity_type": "Motion",
     "timezone":    "Europe/Berlin",
     "attributes": [
       { "object_id": "c", "name": "count", "type": "Integer" }
     ],
     "static_attributes": [
       { "name":"refStore", "type": "Relationship", "value": "urn:ngsi-ld:Store:001"}
     ]
   }
 ]
}
'
In the request we are associating the device motion001 with the URN urn:ngsi-ld:Motion:001 and mapping the device
reading c with the context attribute count (which is defined as an Integer) A refStore is defined as a
static_attribute, placing the device within Store urn:ngsi-ld:Store:001
You can simulate a dummy IoT device measurement coming from the Motion Sensor device motion001, by making the
following request
4 Request:
curl -iX POST \
  'http://localhost:7896/iot/d?k=4jggokgpepnvsb2uv4s40d59ov&i=motion001' \
  -H 'Content-Type: text/plain' \
  -d 'c|1'
A similar request was made in the previous tutorial (before the IoT Agent was connected) when the door was unlocked, you will have seen the state of each motion sensor changing and a Northbound request will be logged in the device monitor.
Now the IoT Agent is connected, the service group has defined the resource upon which the IoT Agent is listening
(iot/d) and the API key used to authenticate the request (4jggokgpepnvsb2uv4s40d59ov). Since both of these are
recognized, the measurement is valid.
Because we have specifically provisioned the device (motion001) - the IoT Agent is able to map attributes before
raising a request with the Orion Context Broker.
You can see that a measurement has been recorded, by retrieving the entity data from the context broker. Don't forget to
add the fiware-service and fiware-service-path headers.
5 Request:
curl -G -X GET \
  'http://localhost:1026/v2/entities/urn:ngsi-ld:Motion:001' \
  -d 'type=Motion' \
  -H 'fiware-service: openiot' \
  -H 'fiware-servicepath: /'
Response:
{
    "id": "urn:ngsi-ld:Motion:001", "type": "Motion",
    "TimeInstant": {
        "type": "ISO8601","value": "2018-05-25T10:51:32.00Z",
        "metadata": {}
    },
    "count": {
        "type": "Integer","value": "1",
        "metadata": {
            "TimeInstant": {"type": "ISO8601","value": "2018-05-25T10:51:32.646Z"}
        }
    },
    "refStore": {
        "type": "Relationship",
        "value": "urn:ngsi-ld:Store:001",
        "metadata": {
            "TimeInstant": {"type": "ISO8601", "value": "2018-05-25T10:51:32.646Z"
        }
    }
}
The response shows that the Motion Sensor device with id=motion001 has been successfully identified by the IoT
Agent and mapped to the entity id=urn:ngsi-ld:Motion:001. This new entity has been created within the context data.
The c attribute from the dummy device measurement request has been mapped to the more meaningful count attribute
within the context. As you will notice, a TimeInstant attribute has been added to both the entity and the metadata of
the attribute - this represents the last time the entity and attribute have been updated, and is automatically added to
each new entity because the IOTA_TIMESTAMP environment variable was set when the IoT Agent was started up. The
refStore attribute comes from the static_attributes set when the device was provisioned.
Provisioning an Actuator
Provisioning an actuator is similar to provisioning a sensor. This time an endpoint attribute holds the location where
the IoT Agent needs to send the UltraLight command and the commands array includes a list of each command that can be
invoked. The example below provisions a bell with the deviceId=bell001. The endpoint is
http://iot-sensors:3001/iot/bell001 and it can accept the ring command. The transport=HTTP attribute defines the
communications protocol to be used.
6 Request:
curl -iX POST \
  'http://localhost:4041/iot/devices' \
  -H 'Content-Type: application/json' \
  -H 'fiware-service: openiot' \
  -H 'fiware-servicepath: /' \
  -d '{
  "devices": [
    {
      "device_id": "bell001",
      "entity_name": "urn:ngsi-ld:Bell:001",
      "entity_type": "Bell",
      "protocol": "PDI-IoTA-UltraLight",
      "transport": "HTTP",
      "endpoint": "http://iot-sensors:3001/iot/bell001",
      "commands": [
        { "name": "ring", "type": "command" }
       ],
       "static_attributes": [
         {"name":"refStore", "type": "Relationship","value": "urn:ngsi-ld:Store:001"}
      ]
    }
  ]
}
'
Before we wire-up the context broker, we can test that a command can be send to a device by making a REST request
directly to the IoT Agent's North Port using the /v2/op/update endpoint. It is this endpoint that will eventually be
invoked by the context broker once we have connected it up. To test the configuration you can run the command directly
as shown:
7 Request:
curl -iX POST \
  http://localhost:4041/v2/op/update \
  -H 'Content-Type: application/json' \
  -H 'fiware-service: openiot' \
  -H 'fiware-servicepath: /' \
  -d '{
    "actionType": "update",
    "entities": [
        {
            "type": "Bell",
            "id": "urn:ngsi-ld:Bell:001",
            "ring" : {
                "type": "command",
                "value": ""
            }
        }
    ]
}'
If you are viewing the device monitor page, you can also see the state of the bell change.

The result of the command to ring the bell can be read by querying the entity within the Orion Context Broker.
8 Request:
curl -G -X GET \
  'http://localhost:1026/v2/entities/urn:ngsi-ld:Bell:001' \
  -d 'type=Bell' \
  -d 'options=keyValues' \
  -H 'fiware-service: openiot' \
  -H 'fiware-servicepath: /'
Response:
{
    "id": "urn:ngsi-ld:Bell:001",
    "type": "Bell",
    "TimeInstant": "2018-05-25T20:06:28.00Z",
    "refStore": "urn:ngsi-ld:Store:001",
    "ring_info": " ring OK",
    "ring_status": "OK",
    "ring": ""
}
The TimeInstant shows last the time any command associated with the entity has been invoked. The result of ring
command can be seen in the value of the ring_info attribute.
Provisioning a Smart Door
Provisioning a device which offers both commands and measurements is merely a matter of making an HTTP POST request with
both attributes and command attributes in the body of the request.
9 Request:
curl -iX POST \
  'http://localhost:4041/iot/devices' \
  -H 'Content-Type: application/json' \
  -H 'fiware-service: openiot' \
  -H 'fiware-servicepath: /' \
  -d '{
  "devices": [
    {
      "device_id": "door001",
      "entity_name": "urn:ngsi-ld:Door:001",
      "entity_type": "Door",
      "protocol": "PDI-IoTA-UltraLight",
      "transport": "HTTP",
      "endpoint": "http://iot-sensors:3001/iot/door001",
      "commands": [
        {"name": "unlock","type": "command"},
        {"name": "open","type": "command"},
        {"name": "close","type": "command"},
        {"name": "lock","type": "command"}
       ],
       "attributes": [
        {"object_id": "s", "name": "state", "type":"Text"}
       ],
       "static_attributes": [
         {"name":"refStore", "type": "Relationship","value": "urn:ngsi-ld:Store:001"}
       ]
    }
  ]
}
'
Provisioning a Smart Lamp
Similarly, a Smart Lamp with two commands (on and off) and two attributes can be provisioned as follows:
10 Request:
curl -iX POST \
  'http://localhost:4041/iot/devices' \
  -H 'Content-Type: application/json' \
  -H 'fiware-service: openiot' \
  -H 'fiware-servicepath: /' \
  -d '{
  "devices": [
    {
      "device_id": "lamp001",
      "entity_name": "urn:ngsi-ld:Lamp:001",
      "entity_type": "Lamp",
      "protocol": "PDI-IoTA-UltraLight",
      "transport": "HTTP",
      "endpoint": "http://iot-sensors:3001/iot/lamp001",
      "commands": [
        {"name": "on","type": "command"},
        {"name": "off","type": "command"}
       ],
       "attributes": [
        {"object_id": "s", "name": "state", "type":"Text"},
        {"object_id": "l", "name": "luminosity", "type":"Integer"}
       ],
       "static_attributes": [
         {"name":"refStore", "type": "Relationship","value": "urn:ngsi-ld:Store:001"}
      ]
    }
  ]
}
'
The full list of provisioned devices can be obtained by making a GET request to the /iot/devices endpoint.
11 Request:
curl -X GET \
  'http://localhost:4041/iot/devices' \
  -H 'fiware-service: openiot' \
  -H 'fiware-servicepath: /'
Enabling Context Broker Commands
Having connected up the IoT Agent to the IoT devices, the Orion Context Broker was informed that the commands are now available. In other words the IoT Agent registered itself as a Context Provider for the command attributes.
Once the commands have been registered it will be possible to ring the Bell, open and close the Smart Door and switch the Smart Lamp on and off by sending requests to the Orion Context Broker, rather than sending UltraLight 2.0 requests directly the IoT devices as we did in the previous tutorial
Ringing the Bell
To invoke the ring command, the ring attribute must be updated in the context.
12 Request:
curl -iX PATCH \
  'http://localhost:1026/v2/entities/urn:ngsi-ld:Bell:001/attrs' \
  -H 'Content-Type: application/json' \
  -H 'fiware-service: openiot' \
  -H 'fiware-servicepath: /' \
  -d '{
  "ring": {
      "type" : "command",
      "value" : ""
  }
}'
If you are viewing the device monitor page, you can also see the state of the bell change.
Opening the Smart Door
To invoke the open command, the open attribute must be updated in the context.
13 Request:
curl -iX PATCH \
  'http://localhost:1026/v2/entities/urn:ngsi-ld:Door:001/attrs' \
  -H 'Content-Type: application/json' \
  -H 'fiware-service: openiot' \
  -H 'fiware-servicepath: /' \
  -d '{
  "open": {
      "type" : "command",
      "value" : ""
  }
}'
Switching on the Smart Lamp
To switch on the Smart Lamp, the on attribute must be updated in the context.
14 Request:
curl -iX PATCH \
  'http://localhost:1026/v2/entities/urn:ngsi-ld:Lamp:001/attrs' \
  -H 'Content-Type: application/json' \
  -H 'fiware-service: openiot' \
  -H 'fiware-servicepath: /' \
  -d '{
  "on": {
      "type" : "command",
      "value" : ""
  }
}'
Service Group CRUD Actions
The CRUD operations for provisioning a service group map on to the expected HTTP verbs under the /iot/services
endpoint
- Create - HTTP POST
- Read - HTTP GET
- Update - HTTP PUT
- Delete - HTTP DELETE
Use the resource and apikey parameters to uniquely identify a service group.
Creating a Service Group
This example provisions an anonymous group of devices. It tells the IoT Agent that a series of devices will be sending
messages to the IOTA_HTTP_PORT (where the IoT Agent is listening for Northbound communications)
15 Request:
curl -iX POST \
  'http://localhost:4041/iot/services' \
  -H 'Content-Type: application/json' \
  -H 'fiware-service: openiot' \
  -H 'fiware-servicepath: /' \
  -d '{
 "services": [
   {
     "apikey":      "4jggokgpepnvsb2uv4s40d59ov",
     "cbroker":     "http://orion:1026",
     "entity_type": "Thing",
     "resource":    "/iot/d"
   }
 ]
}'
Read Service Group Details
This example obtains the full details of a provisioned service with a given resource path.
Service group details can be read by making a GET request to the /iot/services endpoint and providing a resource
parameter.
16 Request:
curl -G -X GET \
  'http://localhost:4041/iot/services' \
  -d 'resource=/iot/d' \
  -H 'fiware-service: openiot' \
  -H 'fiware-servicepath: /'
Response:
{
    "_id": "5b07b2c3d7eec57836ecfed4",
    "subservice": "/",
    "service": "openiot",
    "apikey": "4jggokgpepnvsb2uv4s40d59ov",
    "resource": "/iot/d",
    "attributes": [],
    "lazy": [],
    "commands": [],
    "entity_type": "Thing",
    "internal_attributes": [],
    "static_attributes": []
}
The response includes all the defaults associated with each service group such as the entity_type and any default
commands or attribute mappings.
List all Service Groups
This example lists all provisioned services by making a GET request to the /iot/services endpoint.
17 Request:
curl -X GET \
  'http://localhost:4041/iot/services' \
  -H 'fiware-service: openiot' \
  -H 'fiware-servicepath: /'
Response:
{
    "_id": "5b07b2c3d7eec57836ecfed4",
    "subservice": "/",
    "service": "openiot",
    "apikey": "4jggokgpepnvsb2uv4s40d59ov",
    "resource": "/iot/d",
    "attributes": [],
    "lazy": [],
    "commands": [],
    "entity_type": "Thing",
    "internal_attributes": [],
    "static_attributes": []
}
The response includes all the defaults associated with each service group such as the entity_type and any default
commands or attribute mappings.
Update a Service Group
This example updates an existing service group with a given resource path and apikey
Service group details can be updated by making a PUT request to the /iot/services endpoint and providing a resource
and apikey parameters.
18 Request:
curl -iX PUT \
  'http://localhost:4041/iot/services?resource=/iot/d&apikey=4jggokgpepnvsb2uv4s40d59ov' \
  -H 'Content-Type: application/json' \
  -H 'fiware-service: openiot' \
  -H 'fiware-servicepath: /' \
  -d '{
  "entity_type": "IoT-Device"
}'
Delete a Service Group
This example removes a provisioned service group by making a DELETE request to the /iot/services/ endpoint.
It means that requests to http://iot-agent:7896/iot/d?i=<device_id>&k=4jggokgpepnvsb2uv4s40d59ov (where the IoT Agent
is listening for Northbound communications) should no longer be processed by the IoT Agent. The apiKey and
resource parameters must be supplied in order to identify the service group to be deleted.
19 Request:
curl -iX DELETE \
  'http://localhost:4041/iot/services/?resource=/iot/d&apikey=4jggokgpepnvsb2uv4s40d59ov' \
  -H 'fiware-service: openiot' \
  -H 'fiware-servicepath: /'
Device CRUD Actions
The CRUD operations for provisioning individual devices map on to the expected HTTP verbs under the /iot/devices
endpoint
- Create - HTTP POST
- Read - HTTP GET
- Update - HTTP PUT
- Delete - HTTP DELETE
Use the <device-id> to uniquely identify a device.
Creating a Provisioned Device
This example provisions an individual device. It maps the device_id=bell002 to the entity URN urn:ngsi-ld:Bell:002
and gives the entity a type Bell. The IoT Agent has been informed that the device offers a single ring command and
is listening on http://iot-sensors:3001/iot/bell002 using HTTP. attributes, lazy attributes and
static_attributes can also be provisioned.
20 Request:
curl -iX POST \
  'http://localhost:4041/iot/devices' \
  -H 'Content-Type: application/json' \
  -H 'fiware-service: openiot' \
  -H 'fiware-servicepath: /' \
  -d '{
  "devices": [
    {
      "device_id": "bell002",
      "entity_name": "urn:ngsi-ld:Bell:002",
      "entity_type": "Bell",
      "protocol": "PDI-IoTA-UltraLight",
      "transport": "HTTP",
      "endpoint": "http://iot-sensors:3001/iot/bell002",
      "commands": [
        {
          "name": "ring",
          "type": "command"
        }
       ],
       "static_attributes": [
         {"name":"refStore", "type": "Relationship","value": "urn:ngsi-ld:Store:002"}
      ]
    }
  ]
}'
Read Provisioned Device Details
This example obtains the full details of a provisioned device with a given <device-id> path.
Provisioned Device details can be read by making a GET request to the /iot/devices/<device-id> endpoint.
21 Request:
curl -X GET \
  'http://localhost:4041/iot/devices/bell002' \
  -H 'fiware-service: openiot' \
  -H 'fiware-servicepath: /'
Response:
The response includes all the commands and attributes mappings associated with the device.
{
    "device_id": "bell002",
    "service": "openiot",
    "service_path": "/",
    "entity_name": "urn:ngsi",
    "entity_type": "Bell",
    "endpoint": "http://iot-sensors:3001/iot/bell002",
    "transport": "HTTP",
    "attributes": [],
    "lazy": [],
    "commands": [
        {
            "object_id": "ring",
            "name": "ring",
            "type": "command"
        }
    ],
    "static_attributes": [
        {
            "name": "refStore",
            "type": "Relationship",
            "value": "urn:ngsi-ld:Store:002"
        }
    ],
    "protocol": "PDI-IoTA-UltraLight"
}
List all Provisioned Devices
This example lists all provisioned devices by making a GET request to the /iot/devices endpoint.
22 Request:
curl -X GET \
  'http://localhost:4041/iot/devices' \
  -H 'fiware-service: openiot' \
  -H 'fiware-servicepath: /'
Response:
The response includes all the commands and attributes mappings associated with all devices.
{
    "count": 5,
    "devices": [
      {
          "device_id": "bell002",
          "service": "openiot",
          "service_path": "/",
          "entity_name": "urn:ngsi",
          "entity_type": "Bell",
          "endpoint": "http://iot-sensors:3001/iot/bell002",
          "transport": "HTTP",
          "attributes": [],
          "lazy": [],
          "commands": [
              {
                  "object_id": "ring",
                  "name": "ring",
                  "type": "command"
              }
          ],
          "static_attributes": [
              {
                  "name": "refStore",
                  "type": "Relationship",
                  "value": "urn:ngsi-ld:Store:002"
              }
          ],
          "protocol": "PDI-IoTA-UltraLight"
      },
      etc...
    ]
}
Update a Provisioned Device
This example updates an existing provisioned device by making a PUT request to the /iot/devices/<device-id> endpoint.
23 Request:
curl -iX PUT \
  'http://localhost:4041/iot/devices/bell002' \
  -H 'Content-Type: application/json' \
  -H 'fiware-service: openiot' \
  -H 'fiware-servicepath: /' \
  -d '{
  "entity_type": "IoT-Device"
}'
Delete a Provisioned Device
This example removes a provisioned device by making a DELETE request to the /iot/devices/<device-id> endpoint.
The device attributes will no longer be mapped and commands can no longer be sent to the device. If the device is making active measurements, they will still be handled with default values if the associated service has not been deleted.
24 Request:
curl -iX DELETE \
  'http://localhost:4041/iot/devices/bell002' \
  -H 'fiware-service: openiot' \
  -H 'fiware-servicepath: /'