
![]()
Descripción: Este tutorial enseña a los usuarios de FIWARE los comandos por lotes y las relaciones de entidad. El tutorial se basa en los datos creados en el anterior ejemplo del buscador de tiendas y crea y asocia una serie de entidades de datos relacionados para crear un sencillo sistema de gestión de existencias.
El tutorial usa comandos cUrl en el, pero también está disponible como documentación Postman

Entendiendo las entidades y las relaciones
Dentro de la plataforma FIWARE, el contexto de una entidad representa el estado de un objeto físico o conceptual que existe en el mundo real.
Entidades de un sistema de gestión de stock
Para un sistema de gestión de existencias simple, sólo necesitaremos cuatro tipos de entidad. La relación entre nuestras entidades se define como se muestra:
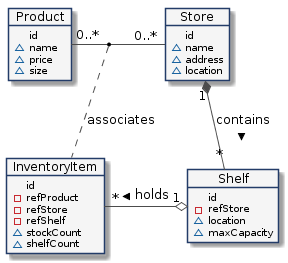
- Una tienda es un edificio de ladrillos y mortero del mundo real. Las entidades
de tipo tienda o Store tendrían propiedades como:
- Un nombre de la tienda, "Punto de control Markt"
- Una dirección, "Friedrichstraße 44, 10969 Kreuzberg, Berlin"
- Una ubicación física: 52.5075 N, 13.3903 E
- Un estante es un objeto del mundo real para guardar los objetos que queremos
vender. Cada entidad de Estante o Shelf tendrá propiedades como:
- Un nombre de la estantería, por ejemplo, "Unidad de pared"
- Un lugar fíisico, por ejemplo, 52.5075 N, 13.3903 E
- Una capacidad máxima
- Una asociación a la tienda en la que está presente el estante
- Un producto se define como algo que se vende - de forma conceptual. Las entidades de tipo producto o Product tendrán atributos como:
- Un nombre del producto, por ejemplo "Vodka".
- Un precio, por ejemplo, 13,99 euros
- Un tamaño, por ejemplo, pequeño
- Un articulo de inventario es otra entidad conceptual empleada para asociar productos, tiendas estantes y objetos físicos. Una entidad de artículo de inventario o Inventory Item tendría propiedades como:
- Una asociación con el producto que se vende
- Una asociación a la tienda en la que se vende el producto
- Una asociación con el estante donde se exhibe el producto
- Un recuento de la cantidad de producto disponible en el almacén
- Un recuento de la cantidad de producto disponible en la estantería
Como puede ver, cada una de las entidades definidas anteriormente contienen algunas propiedades que pueden cambiar. Un producto podría cambiar su precio, las existencias podrían venderse y el número de existencias en las estanterías podría reducirse y así sucesivamente.
Nota este tutorial utiliza el siguiente estilo tipográfico :
- Los tipos de entidades van en texto en negrita
- Los atributos de los datos se escriben en el "texto del monoespacio
- Los artículos en el mundo real usan texto simple
Por lo tanto, una tienda en el mundo real está representada en los datos de contexto por una entidad de tipo tienda o Store, y un estante en el mundo real encontrado en una tienda es representado en los datos de contexto por una entidad Shelf que tiene un atributo
refStore.
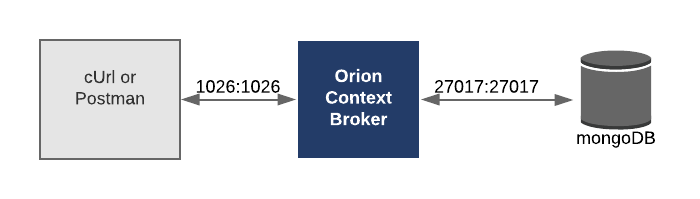
Arquitectura
Nuestra aplicación de demostración sólo hará uso de un componente FIWARE - el Orion Context Broker. El uso del Orion Context Broker es suficiente para que una aplicación se califique como "Powered by FIWARE".
Actualmente, el Orion Context Broker se basa en la tecnología de código abierto MongoDB para la persistencia de los datos de contexto que contiene. Por lo tanto, la Arquitectura constará de dos elementos:
- El Orion Context Broker quien recibirá las peticiones usando NGSI
- La base de datos que hay por debajo MongoDB :
- Utilizada por el Orion Context Broker para mantener información de datos de contexto como los datos de las entidades, suscripciones y registros
Dado que todas las interacciones entre los dos elementos son iniciadas por peticiones HTTP, estos pueden ser contenedorizado sy correr desde los puertos expuestos.
La información de configuración necesaria se puede observar en la sección de servicios del fichero docker-compose.yml asociado:
orion:
    image: fiware/orion:latest
    hostname: orion
    container_name: fiware-orion
    depends_on:
        - mongo-db
    networks:
        - default
    expose:
        - "1026"
    ports:
        - "1026:1026"
    command: -dbhost mongo-db -logLevel DEBUG
mongo-db:
    image: mongo:3.6
    hostname: mongo-db
    container_name: db-mongo
    expose:
        - "27017"
    ports:
        - "27017:27017"
    networks:
        - default
    command: --bind_ip_all --smallfiles
Ambos contenedores residen en la misma red - el Orion Context Broker está escuchando en el puerto "1026" y MongoDB está escuchando en el puerto por defecto "27071". Ambos contenedores también están exponiendo los mismos puertos externamente - esto es puramente para el acceso al tutorial - para que cUrl o Postman puedan acceder a ellos sin ser parte de la misma red. La inicialización de la línea de comandos debería ser autoexplicativa.
Prerequisitos
Docker
Para mantener las cosas simples, ambos componentes se ejecutarán usando Docker. Docker es una tecnología de contenedores que permite aislar diferentes componentes en sus respectivos entornos.
- Para instalar Docker en Windows siga las instrucciones aquí
- Para instalar Docker en Mac siga las instrucciones aquí
- Para instalar Docker en Linux siga las instrucciones aquí
Docker Compose (Opcional)
Docker Compose es una herramienta para definir y ejecutar aplicaciones Docker multi-contenedor. A Se utiliza el archivo YAML para configurar los servicios requeridos para la aplicación. Esto significa que todos los servicios de los contenedores pueden ser lanzados en un solo comando. Docker Compose se instala de forma predeterminada como parte de Docker para Windows y Docker para Mac, sin embargo los usuarios de Linux tendrá que seguir las instrucciones que se encuentran aquí
Puede comprobar sus versiones actuales de Docker y Docker Compose usando los siguientes comandos:
docker-compose -v
docker version
Por favor, asegúrese de que está utilizando la versión 18.03 o superior de Docker y la versión 1.21 o superior de Docker Compose y actualícela si es necesario.
Start Up
Todos los servicios pueden ser inicializados desde la línea de comandos ejecutando el bash script services provisto dentro del repositorio. Por favor, clone el repositorio y cree las imágenes necesarias ejecutando los comandos como se muestra:
git clone https://github.com:FIWARE/tutorials.Entity-Relationships.git
cd tutorials.Entity-Relationships

./services start
Este comando también importará datos de inicio del anterior tutorial de Buscador de tiendas al iniciarse.
Nota: Si quieres borrar y empezar de nuevo puedes hacerlo con el siguiente comando:
./services stop
Creación y asociación de entidades de datos
Creación de varias entidades a la vez
En el tutorial anterior, creamos cada entidad de tienda o Store de forma individual. Vamos a crear cinco unidades de estantes al mismo tiempo. Esta petición usa el extremo de la API de procesamiento por lotes para crear cinco entidades de estantes. El procesamiento por lotes utiliza el extremo de la API "v2/op/update" con mensaje con dos atributos:
- actionType=APPEND que indica que vamos a sobrescribir las entidades si ya existen
- entities que contiene el conjunto de entidades que queremos actualizar
Para diferenciar las entidades de tipo estante o Shelf de las tiendas o Store, a cada estante se le ha añadido type=Shelf. Las propiedades del mundo real como nombre name y la localización location se han añadido a las propiedades de cada estante.
1 Request:
curl -iX POST \
  'http://localhost:1026/v2/op/update' \
  -H 'Content-Type: application/json' \
  -d '{
  "actionType":"APPEND",
  "entities":[
    {
      "id":"urn:ngsi-ld:Shelf:unit001", "type":"Shelf",
      "location":{
        "type":"geo:json", "value":{ "type":"Point","coordinates":[13.3986112, 52.554699]}
      },
      "name":{
        "type":"Text", "value":"Corner Unit"
      },
      "maxCapacity":{
        "type":"Integer", "value":50
      }
    },
    {
      "id":"urn:ngsi-ld:Shelf:unit002", "type":"Shelf",
      "location":{
        "type":"geo:json","value":{"type":"Point","coordinates":[13.3987221, 52.5546640]}
      },
      "name":{
        "type":"Text", "value":"Wall Unit 1"
      },
      "maxCapacity":{
        "type":"Integer", "value":100
      }
    },
    {
      "id":"urn:ngsi-ld:Shelf:unit003", "type":"Shelf",
      "location":{
        "type":"geo:json", "value":{"type":"Point","coordinates":[13.3987221, 52.5546640]}
      },
      "name":{
        "type":"Text", "value":"Wall Unit 2"
      },
      "maxCapacity":{
        "type":"Integer", "value":100
      }
    },
    {
      "id":"urn:ngsi-ld:Shelf:unit004", "type":"Shelf",
      "location":{
        "type":"geo:json", "value":{"type":"Point","coordinates":[13.390311, 52.507522]}
      },
      "name":{
        "type":"Text", "value":"Corner Unit"
      },
      "maxCapacity":{
        "type":"Integer", "value":50
      }
    },
    {
      "id":"urn:ngsi-ld:Shelf:unit005", "type":"Shelf",
      "location":{
        "type":"geo:json","value":{"type":"Point","coordinates":[13.390309, 52.50751]}
      },
      "name":{
        "type":"Text", "value":"Long Wall Unit"
      },
      "maxCapacity":{
        "type":"Integer", "value":200
      }
    }
  ]
}'
De forma similar, podemos crear una serie de entidades de produtos Product usando el modificador de tipo type=Product.
2 Petición:
curl -iX POST \
  'http://localhost:1026/v2/op/update' \
  -H 'Content-Type: application/json' \
  -d '{
  "actionType":"APPEND",
  "entities":[
    {
      "id":"urn:ngsi-ld:Product:001", "type":"Product",
      "name":{
        "type":"Text", "value":"Beer"
      },
      "size":{
        "type":"Text", "value": "S"
      },
      "price":{
        "type":"Integer", "value": 99
      }
    },
    {
      "id":"urn:ngsi-ld:Product:002", "type":"Product",
      "name":{
        "type":"Text", "value":"Red Wine"
      },
      "size":{
        "type":"Text", "value": "M"
      },
      "price":{
        "type":"Integer", "value": 1099
      }
    },
    {
      "id":"urn:ngsi-ld:Product:003", "type":"Product",
      "name":{
        "type":"Text", "value":"White Wine"
      },
      "size":{
        "type":"Text", "value": "M"
      },
      "price":{
        "type":"Integer", "value": 1499
      }
    },
    {
      "id":"urn:ngsi-ld:Product:004", "type":"Product",
      "name":{
        "type":"Text", "value":"Vodka"
      },
      "size":{
        "type":"Text", "value": "XL"
      },
      "price":{
        "type":"Integer", "value": 5000
      }
    }
  ]
}'
En ambos casos hemos codificado cada id de entidad de acuerdo con la
especificación de NGSI-LD - the proposal
is that each id is a URN follows a standard format: urn:ngsi-ld:<entity-type>:<entity-id>. This will mean that every
id in the system will be unique.
Shelf information can be requested by making a GET request on the /v2/entities endpoint. For example to return the
context data of the Shelf entity with the id=urn:ngsi-ld:Shelf:unit001.
3 Request:
curl -G -X GET \
  'http://localhost:1026/v2/entities/urn:ngsi-ld:Shelf:unit001' \
  -d 'type=Shelf' \
  -d 'options=keyValues'
Response:
{
    "id": "urn:ngsi-ld:Shelf:unit001",
    "type": "Shelf",
    "location": {
        "type": "Point",
        "coordinates": [13.3986112, 52.554699]
    },
    "maxCapacity": 50,
    "name": "Corner Unit"
}
As you can see there are currently three additional property attributes present location, maxCapacity and name
Creating a one-to-many Relationship
In databases, foreign keys are often used to designate a one-to-many relationship - for example every shelf is found in
a single store and a single store can hold many shelving units. In order to remember this information we need to add an
association relationship similar to a foreign key. Batch processing can again be used to amend the existing the
Shelf entities to add a refStore attribute holding the relationship to each store. According to the FIWARE Data
Modelling Guidelines on
linked data, when an
entity attribute is used as a link to other entities it should be named with the prefix ref plus the name of the
target (linked) entity type.
The value of the refStore attribute corresponds to a URN associated to a Store entity itself.
The URN follows a standard format: urn:ngsi-ld:<entity-type>:<entity-id>
4 Request:
The following request associates three shelves to urn:ngsi-ld:Store:001 and two shelves to urn:ngsi-ld:Store:002
curl -iX POST \
  'http://localhost:1026/v2/op/update' \
  -H 'Content-Type: application/json' \
  -d '{
  "actionType":"APPEND",
  "entities":[
    {
      "id":"urn:ngsi-ld:Shelf:unit001", "type":"Shelf",
      "refStore": {
        "type": "Relationship",
        "value": "urn:ngsi-ld:Store:001"
      }
    },
    {
      "id":"urn:ngsi-ld:Shelf:unit002", "type":"Shelf",
      "refStore": {
        "type": "Relationship",
        "value": "urn:ngsi-ld:Store:001"
      }
    },
    {
      "id":"urn:ngsi-ld:Shelf:unit003", "type":"Shelf",
      "refStore": {
        "type": "Relationship",
        "value": "urn:ngsi-ld:Store:001"
      }
    },
    {
      "id":"urn:ngsi-ld:Shelf:unit004", "type":"Shelf",
      "refStore": {
        "type": "Relationship",
        "value": "urn:ngsi-ld:Store:002"
      }
    },
    {
      "id":"urn:ngsi-ld:Shelf:unit005", "type":"Shelf",
      "refStore": {
        "type": "Relationship",
        "value": "urn:ngsi-ld:Store:002"
      }
    }
  ]
}'
Now when the shelf information is requested again, the response has changed and includes a new property refStore,
which has been added in the previous step.
5 Request:
curl -G -X GET \
  'http://localhost:1026/v2/entities/urn:ngsi-ld:Shelf:unit001' \
  -d 'type=Shelf' \
  -d 'options=keyValues'
Response:
The updated response including the refStore attribute is shown below:
{
    "id": "urn:ngsi-ld:Shelf:unit001",
    "type": "Shelf",
    "location": {
        "type": "Point",
        "coordinates": [13.3986112, 52.554699]
    },
    "maxCapacity": 50,
    "name": "Corner Unit",
    "refStore": "urn:ngsi-ld:Store:001"
}
Reading a Foreign Key Relationship
Reading from Child Entity to Parent Entity
We can also make a request to retrieve the refStore attribute relationship information from a known Shelf entity
by using the options=values setting
6 Request:
curl -G -X GET \
  'http://localhost:1026/v2/entities/urn:ngsi-ld:Shelf:unit001' \
  -d 'type=Shelf' \
  -d 'options=values' \
  -d 'attrs=refStore'
Response:
["urn:ngsi-ld:Store:001"]
This can be interpreted as "I am related to the Store entity with the id=urn:ngsi-ld:Store:001"
Reading from Parent Entity to Child Entity
Reading from a parent to a child can be done using the options=count setting
7 Request:
curl -G -X GET \
  'http://localhost:1026/v2/entities' \
  -d 'q=refStore==urn:ngsi-ld:Store:001' \
  -d 'options=count' \
  -d 'attrs=type' \
  -d 'type=Shelf'
This request is asking for the id of all Shelf entities associated to the URN urn:ngsi-ld:Store:001, the
response is a JSON array as shown.
Response:
[
    {
        "id": "urn:ngsi-ld:Shelf:unit001",
        "type": "Shelf"
    },
    {
        "id": "urn:ngsi-ld:Shelf:unit002",
        "type": "Shelf"
    },
    {
        "id": "urn:ngsi-ld:Shelf:unit003",
        "type": "Shelf"
    }
]
In plain English, this can be interpreted as "There are three shelves in urn:ngsi-ld:Store:001". The request can be
altered use the options=values and attrs parameters to return specific properties of the relevant associated
entities. For example the request:
8 Request:
curl -G -X GET \
  'http://localhost:1026/v2/entities' \
  -d 'q=refStore==urn:ngsi-ld:Store:001' \
  -d 'type=Shelf' \
  -d 'options=values' \
  -d 'attrs=name'
Can be interpreted as request for Give me the names of all shelves in urn:ngsi-ld:Store:001.
Response:
[["Corner Unit"], ["Wall Unit 1"], ["Wall Unit 2"]]
Creating many-to-many Relationships
Bridge Tables are often used to relate many-to-many relationships. For example, every store will sell a different range of products, and each product is sold in many different stores.
In order to hold the context information to "place a product onto a shelf in a given store" we will need to create a new
data entity InventoryItem which exists to associate data from other entities. It has a foreign key relationship to
the Store, Shelf and Product entities and therefore requires relationship attributes called refStore,
refShelf and refProduct.
Assigning a product to a shelf is simply done by creating an entity holding the relationship information and any other
additional properties (such as stockCount and shelfCount)
9 Request:
curl -iX POST \
  'http://localhost:1026/v2/entities' \
  -H 'Cache-Control: no-cache' \
  -H 'Content-Type: application/json' \
  -H 'Postman-Token: 0588ef62-6b5c-4d1b-8066-172d63b516fd' \
  -d '{
    "id": "urn:ngsi-ld:InventoryItem:001", "type": "InventoryItem",
    "refStore": {
        "type": "Relationship",
        "value": "urn:ngsi-ld:Store:001"
    },
    "refShelf": {
        "type": "Relationship",
        "value": "urn:ngsi-ld:Shelf:unit001"
    },
    "refProduct": {
        "type": "Relationship",
        "value": "urn:ngsi-ld:Product:001"
    },
    "stockCount":{
        "type":"Integer", "value": 10000
    },
    "shelfCount":{
        "type":"Integer", "value": 50
    }
}'
Reading from a bridge table
When reading from a bridge table entity, the type of the entity must be known.
After creating at least one InventoryItem entity we can query Which products are sold in urn:ngsi-ld:Store:001?
by making the following request
10 Request:
curl -G -X GET \
  'http://localhost:1026/v2/entities' \
  -d 'q=refStore==urn:ngsi-ld:Store:001' \
  -d 'options=values' \
  -d 'attrs=refProduct' \
  -d 'type=InventoryItem'
Response:
[["urn:ngsi-ld:Product:001"]]
Similarly we can request Which stores are selling urn:ngsi-ld:Product:001? by altering the request as shown:
11 Request:
curl -G -X GET \
  'http://localhost:1026/v2/entities' \
  -d 'q=refProduct==urn:ngsi-ld:Product:001' \
  -d 'options=values' \
  -d 'attrs=refStore'\
  -d 'type=InventoryItem'
Response:
[["urn:ngsi-ld:Store:001"]]
Data Integrity
Context data relationships should only be set up and maintained between entities that exist - in other words the URN
urn:ngsi-ld:<entity-type>:<entity-id> should link to another existing entity within the context. Therefore we must
take care when deleting an entity that no dangling references remain. Imagine urn:ngsi-ld:Store:001 is deleted - what
should happen to the associated the Shelf entities?
It is possible to make a request to see if any remaining entity relationship exists prior to deletion by making a request as follows
12 Request:
curl -G -X GET \
  'http://localhost:1026/v2/entities' \
  -d 'q=refStore==urn:ngsi-ld:Store:001' \
  -d 'options=count' \
  -d 'attrs=type'
13 Request:
The response lists a series of Shelf and InventoryItem entities - there are no Product entities since there is no direct relationship between product and store.
[
    {
        "id": "urn:ngsi-ld:Shelf:unit001",
        "type": "Shelf"
    },
    {
        "id": "urn:ngsi-ld:Shelf:unit002",
        "type": "Shelf"
    },
    {
        "id": "urn:ngsi-ld:Shelf:unit003",
        "type": "Shelf"
    },
    {
        "id": "urn:ngsi-ld:InventoryItem:001",
        "type": "InventoryItem"
    }
]
If this request returns an empty array, the entity has no associates.